Sign in with Google
This extension allows your app users to sign in with Google to your WordPress site.
This extension is not available on all plans. To use this login feature, your AppPresser plan needs to be Advanced or higher.
Prerequisites
- An existing Firebase property for your app. Please see Android Push Notifications to set that up if you haven't already.
- An App build already uploaded to Google Play
- An App build already uploaded to App Store Connect
- The AppSocial plugin installed on your WordPress site
Google Cloud Configuration
Google Login requires several authentication components to function:
- An OAuth Consent Screen (The screen after selecting your Google account showing your Organisation and what information from the Google Account will be accessed)
- An iOS OAuth Client ID (Used for iOS builds)
- An Android OAuth Client ID (Used for Android builds)
- A Web OAuth Client ID (Used for both )
These need to be created in the Google Cloud property associated with your Google Firebase property. You can ensure you're in the right Google Cloud Project by going to Project Settings -> Service Accounts -> Manage Service Account Permissions from the Firebase dashboard

Once in Google Cloud, from the left menu head to APIs & Services -> Credentials

From there we will create the 3 OAuth Keys
Create an OAuth key for Android
Click on CREATE CREDENTIALS -> OAuth client ID

Application Type: Android
Name: Android (Production)
Package Name: com.########.app (This is your Bundle ID from the MyAppPresser metadata tab)
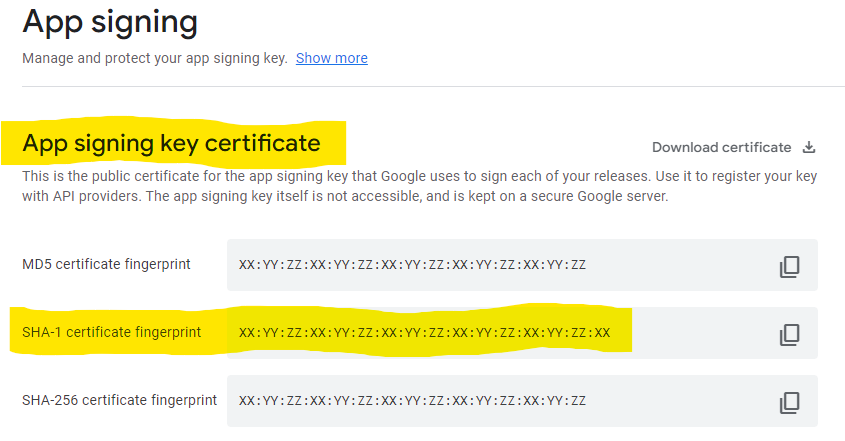
SHA-1 Certificate: XX:YY:ZZ:XX:YY:ZZ:XX:YY:ZZ:XX:YY:ZZ (Obtain this value from the Google Play Console under Setup->App Signing -> App signing key certificate )
Create an OAuth key for iOS
Click on CREATE CREDENTIALS -> OAuth client ID
Application Type: iOS
Name: iOS Client
Bundle ID: com.########.app (This is your Bundle ID from the MyAppPresser metadata tab)
App Store ID: 123456789 (Obtain this value from the App Store Connect under App Information -> Apple ID )
Team ID: 123AB456CD (Obtain this value from Apple Developer under Membership Card -> Team ID )

Create an OAuth key for Web
Click on CREATE CREDENTIALS -> OAuth client ID
Application Type: Web Application
Name: Web Client
Authorised Javascript Origins: Add bothhttp://localhost & http://localhost:5000
Configure Consent Screen
From the left menu head to OAuth Consent Screen
Set User Type to External
App Name: My App Name (Use the name of your app you want your users to see as this is shown to the user in the Google Signin Modal)
User Support Email: Select an email from the dropdown to use
App Domain/Privacy Policy/Terms of Service: Fill these in with the appropriate links from your website
Authorised Domains: mywebsitedomain.com (Enter your website domain without the https://)
After Saving ensure Publishing Status is switched to be Production
Mapping Client IDs
Back on the credentials screen you should have 3 Client IDs. We need to copy the Client ID field for each and paste it in the correct location

The Web Client ID goes in MyAppPresser under the Login settings tab

The iOS and Android Client IDs get set in the AppSocial Plugin settings

Firebase iOS Google Services File
The last required item for Google Social login is only for iOS builds and is the Google-Services file from Firebase for your iOS app. You may have already added this file to MyAppPresser as part of the Analytics setup but if not you'll need to create it in Firebase.
From your Firebase Console head to Project Settings -> General and add an Apple app if one doesn't already exist.
App Bundle ID: com.########.app (This is your Bundle ID from the MyAppPresser metadata tab)
App Nickname: MyCoolApp (Optional label for the app within Firebase)
App Store ID: 123456789 (Obtain this value from the App Store Connect under App Information -> Apple ID )
Click Register app and then Download the GoogleService-Info.plist file. This is what gets uploaded to the field in MyAppPresser. You can skip the rest of the steps in Firebase.

Testing Social Login
As social login requires details relative to your App Store App listings it will not work in Debug builds. To test Social Login you'll need to use TestFlight through App Store Connect for iOS and one of the Testing Tracks in Google Play Console for Android.